• Skip to main content
  • Skip to secondary menu
  • Skip to primary sidebar

Mechanicaleng blog

siemens nx tutorial & injection molding technology

  • Plastic molding
  • Siemens nx
    • nx modeling
    • nx drafting
    • nx sketching
    • nx assembly
  • Mechanical basic
    • mechanical standard
    • Mechanism video
  • microsoft office
    • microsoft word
    • powerpoint
    • excel tips
  • About me
  • CONTACT ME
Home » Siemens nx » nx modeling » Siemens nx how to use rib command

Siemens nx how to use rib command

December 21, 2018 by mechanicaleng blog Leave a Comment

In the siemens nx, rib command use to add a thin-wall or rib network by extruding a planar section to intersect a solid body.

Where do I find it?

From the menu (Top border bar): Insert -> design feature -> rib.

siemens nx rib icon
siemens nx rib icon

From the home tab: Feature group -> More gallery -> Design feature gallery -> rib.

You are reading a guide how to use rib command in Siemens NX. Click here to read all design feature in Simens NX.

How to use rib command?

1.From the menu: insert -> design feature -> rib.

2. Click select body option in the target group then select target solid body in the graphics window.

siemens nx rib select target body

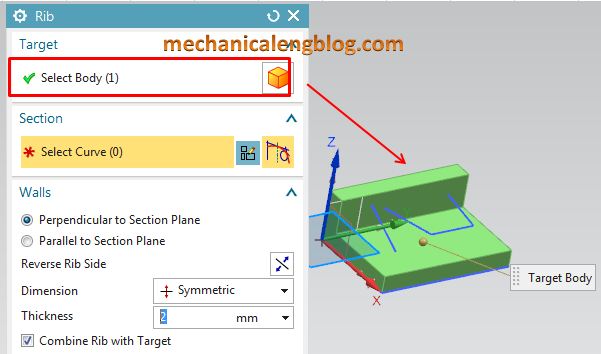
3. In the section group, you can click on curve icon then select curve in the graphics window or click on sketch section then draw new curves.

4. In the walls group we have two options.

+ Perpendicular to section plane: Orients the rib walls perprndicular to the section plane.

+ Parallel to section plane: Orients the rib walls parallel to the section plane. Available only for a single curve change.

For this tutorial, I will select perpendicular to section plane.

In the simension list, select symmetric. Type 5 (mm) in the thickness box.

Check on combine rib with target box.

siemens nx rib create wall thickness

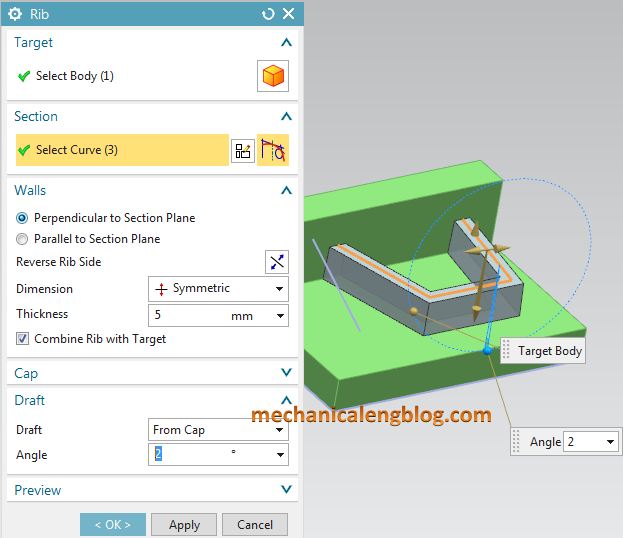
5. In the draft group, from draft type list, select from cap option. Type 2 deg in the angle box.

6. Click OK or apply to complete.

Related posts:

create feature vith siemens nx revolve commandsiemens nx revolve command create a general pocket in nxSiemens nx modeling create a pocket siemens nx surface through curves commandSiemens nx surface how to use through curves command siemens nx modeling create an embossingSiemens nx modeling create an embossing

Filed Under: nx modeling Tagged With: design feature

Reader Interactions

Leave a Reply Cancel reply

Your email address will not be published. Required fields are marked *

Primary Sidebar

Recent Posts

  • what is spur gear | introduction
  • Mechanical engineering skills from training process
  • What is Inox | Stainless Steel?
  • How to create thread in nx
  • nx assembly| create a new part from the same part
  • how to calculate sum of squares in Excel
  • How to active GC toolkits in Siemens NX
  • How to create a sphere in nx
  • How to create a cone in nx
  • How to create a cylinder in nx

Copyright © 2023 · Magazine Pro on Genesis Framework · WordPress · Log in