Have you even wondered, create dotted lines in Word might be very easy, just press the dot button in the keyboard over and over? But that work takes so much time and very unprofessional, so I won’t encourage you to do it.
May you like: draw broken line in word.
How to create dotted lines in Word?
Today in this article I will guide you in details how to create dotted lines (….) very easily. Please follow these steps:
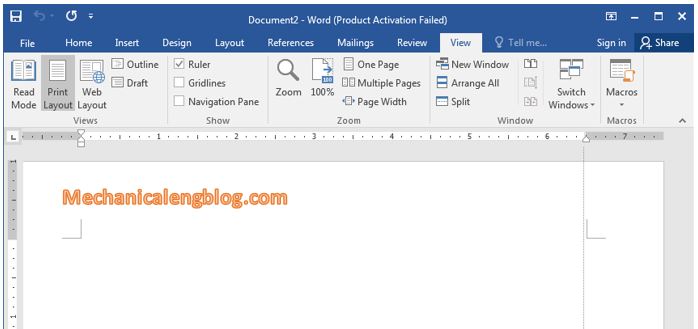
Step 1: First, make sure your Word application has turned on the Ruler bar. If not, activate it by go to View, then check the box Ruler.

Step 2: Now in the Ruler bar, define the starting and the ending point by clicking the small symbol in the Ruler bar and move to the position you want. That is the length of the dotted line you want to create.

Step 3: Set up Use Shortcut, can create dotted or dashed lines very quickly.
Click on tab Home, then in Paragraph click onto the small icon as shown in the picture below. Or another way, you can right-click on a white space of Word and choose Paragraph.
A new window appears, click on Tabs…

Set up the information as you want. Here is my setting.
Step 4: Now we can see how it works.
Move the pointer to where you want to create dotted lines and press the Tab button (above Caps Lock) in the keyboard. Each Tab corresponds to one line, and that’s it.

CONCLUSION
So with just a few simple steps you can create a bunch of dotted lines, very quickly very easy and can save a lot of time. Just a little trick but hopefully it will help you with your work.


Leave a Reply