In the Siemens nx sketching, This tutorial I will guide copy, edit, move objects in sketch. You must exit the command before you copy, move, or edit the objects.
I. Siemens nx move objects in sketch
A. Use shortcut key from your keyboard and mouse.
+ Move curve, points, or dimensions: Drag the points, center of curves, or dimension then move to where you want.
+ If you want to move curves or points vertically or horizontally with snapping, hold shift key and drag the curves or point.
+ Move curves or points vertically or horizontally without snapping, hole shift +alt key and drag the curves or points.
B. Use move curve command.
Moves a set of curves and adjusts adjacent curves to accommodate.
Where do I find it?
From the menu: Edit -> sketch curve -> move curve.
From the home tab: Direct sketch group -> sketch curve gallery -> edit curve gallery -> move curve.
How to use move curve command?
1. From the home tab, select move curve icon command.
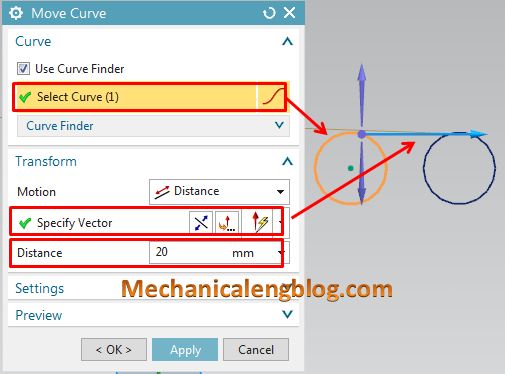
2. In the move curve dialog, curve group, select curve is active. In the graphics window, select curve that you want to move.
4. Drag your mouse to move the curve to where you want.
5. If you don’t want to drag your mouse, you can use transform option in the move curve dialog. For this tutorial, I will select distance option.
6. Select the specify vector.
7. Type value in the distance box.
8. Click OK to complete.
II. Siemens nx copy objects in sketch.
1. Copy curves or points: hold CTRL key and drag the curves or points to where you want.
2. Copy curves or points vertically or horizontally without snapping, hold CTRL + shift key and drag curves or points.
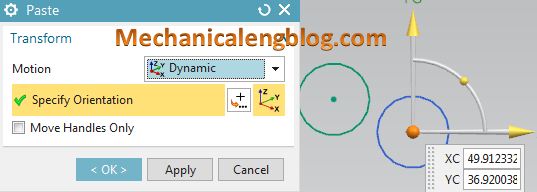
3. Selects the curves, and press CTRL+ C from your keyboard then press CTRL+ V from your keyboard. The Pate dialog will appear. Use transforms option to move the copy curves.
Note: You need click on the curve, not center of curve. If you click on center of curve, move curve will active.
III. Edit objects.
To edit the objects, double-click the objects then modify it.
IV. The transform options.
There are 9 transform options in the motion list.
+ Distance-Angle: Defines the motion by a single linear transform, a single angular transform, or a combination of the two.
+ Distance: Defines the motion by a distance along vector.
+ Angle: Defines the motion by a rotation angle around an axis.
+ Distance between two points: Defines the motion by a distance between an origin point and a measurement point along an axis.
+ Point to point: Defines the motion by a transformation from one points to another.
+ Rotate by three points: Defines the motion by a rotation around an axis. The angle is measured between three points.
+ Align axis to vector: Defines the motion by rotating an axis about a pivot point, such that the axis becomes parallel with a reference vector.
+ Dynamic: Determines the transformation using the WCS dynamics manipulator. This transform is not associative.
+ Delta XYZ: Determines the transformation using delta X, Y, and Z values relative to the absolute or work coordinate system. This transform is not associative.

Leave a Reply