In this tutorial, I will guide to you how to protect a document in Word by Restrict Editing function.
Microsoft Word provides us a lot of methods to protect documents, such as password protection, limit the right to edit text … and some specifically methods such as:
Read-Only: This mode allows reading only text.
Password: This mode helps to protect Word documents with a password. Similar to Excel, this method of protection has 2 options: open and edit, open and view only.
Restrict Editing: This mode limits text formatting and editing permissions.
Restrict Access: This mode will restrict access.
Digital Signature: Electronic signature to advoid counterfeiting.
Okay, and now I will go into a more detailed instruction of protecting documents speically using Restrict Editing so you can easily imagine.
May you like: how to lock a word document from editing
I. Protect a document in Word by format change restriction.
1: In Review, look to the Protect section and choose Restrict Editing.

2: When opened Restrict Editing, check at the box Limit formatting to a selection of styles.

3: Choose Setting so that the Formatting Restriction box appears. Check the boxes to choose the styles that are allowed to be used like the picture below. Then click OK.

4: A notice window “This document may contain formatting or styles that aren allowed. Do you want to remove them?” appears.
=> You choose Yes to delete or choose No to keep.

5: Select Yes, Start Enforcing Protection. The Start Enforcing Protection box appears. Here, enter a password (if you want) in the box Enter new password (optional): and confirm in the box Reenter password to confirm.
Then select OK.

And you have suceeded restrict format change.
II. Content editing restriction.
1: You do the same as Step 1 in the I above.
2: In the Restrict Editing panel check the line Allow only this type of editing in the document.
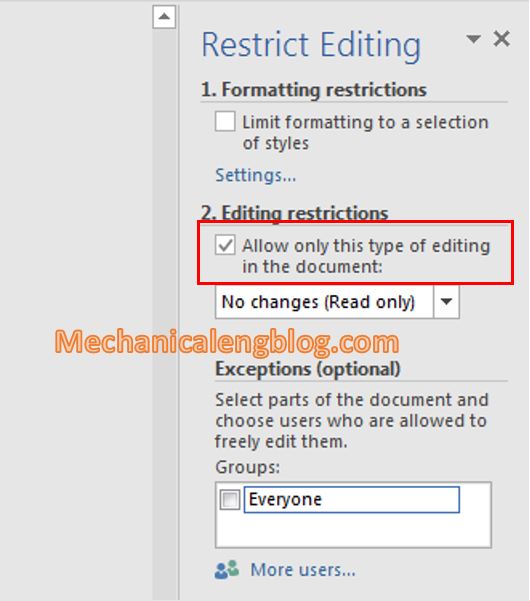
3: Click on the drop-down icon in No changes (Read Only) box to choose what kind of adjustment is allowed.
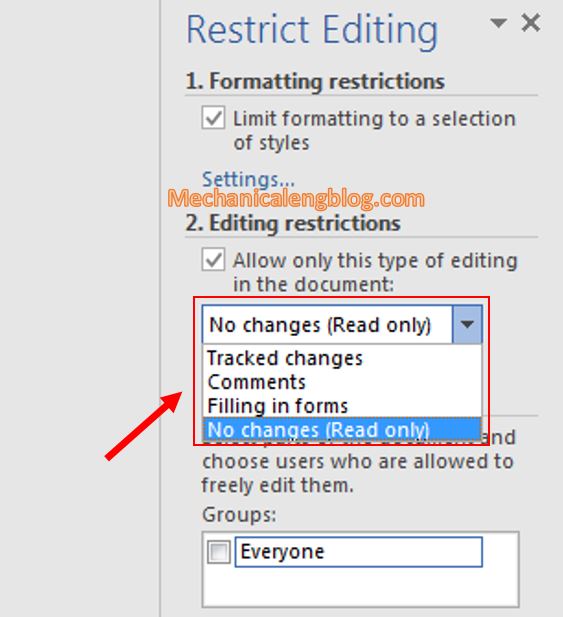
Tracked changes allow tracing to be performed.
Comments allows comments to be made.
Filling in forms allows you to fill out forms.
No changes (Read only) do not allow to change / edit the content.
4: (Optional) Declare the content areas to be changed.
Select the content (you can select multiple parts by hold down Ctrl and select). Then select Everyone.
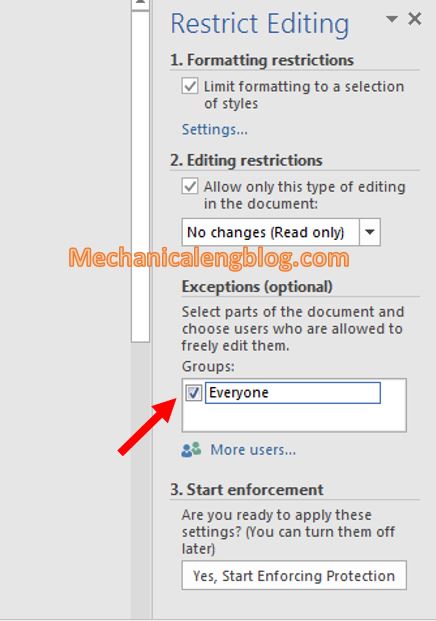
5: The same as Step 5 in #1.
As soon as Step 5 is done, the Restrict Editing panel will appear, provides us with the features:
Find Next Region I Can Edit finds the next area of content that can be edited.
Show All Regions I Can Edit shows all the editable content areas.
Highlight the regions I can edit highlight the editable content areas.

CONCLUSION
So I have shared with you the very detailed methods of protecting Word documents with Restrict Editing feature available on Word. Usually people will use these protection methods when required or wanting to protect their document from being viewed, edited,…by others.
Hope this post will be a new useful knowledge for you. Thanks for reading and see you in the next articles.
-hhchi


Leave a Reply