Actually there are other ways to create a table of contents, but the reason I want to introduce how to create a table of contents on word with this tool – Multilevel List – because it will help you do this much faster, and more professionally.
With this method, you can easily customize the title tags such as changing the color of all titles, bold, italic, change font size … even when you have finished the table of contents. Also you can quickly navigate to the content of the Word file that you want to read by clicking the corresponding item in the Table of Contents section.
Generally a lot of utility, and the way to do it is also simple. You can do the same with other versions since my version is 2016, let’s begin.
I. Preparation.
Firstly, set the units of inches to centimeters. Go to File to choose Options. Then, in Advanced find the Display section. You can change the unit of measurements there.
Secondly, you need to define in advance what will be Heading 1 (Level 1), which is Heading 2 (Level 2)…
For example, in my sample file, I have bolded the parts corresponding to the levels below:

II. Create Style for Multilevel List.
You only have to create Style once for one heading and you can use it for the rest.
Step 1: Open Word file needs to be processed. Go to Home, select Multilevel List icon then select Define new Multilevel List as shown below.
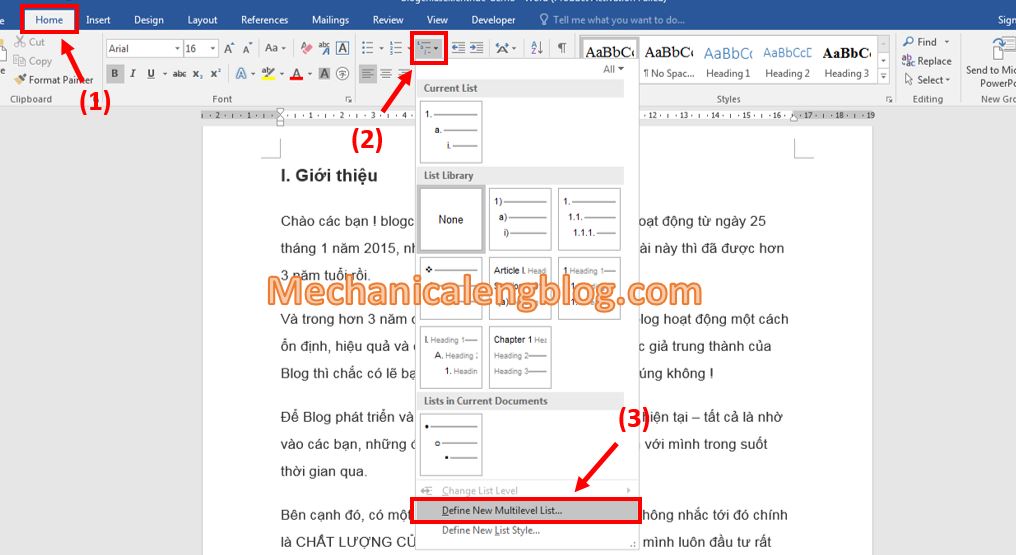
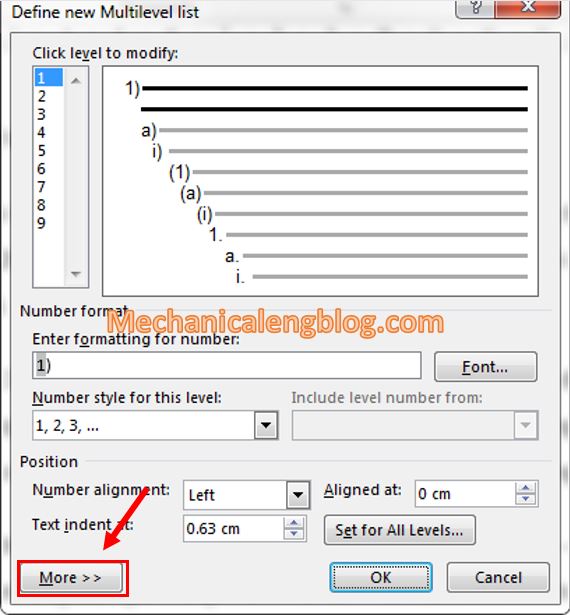
Step 2: The Define new Multilevel List window appears, click the More >> button to expand the settings.
1. Customize Style for Level 1
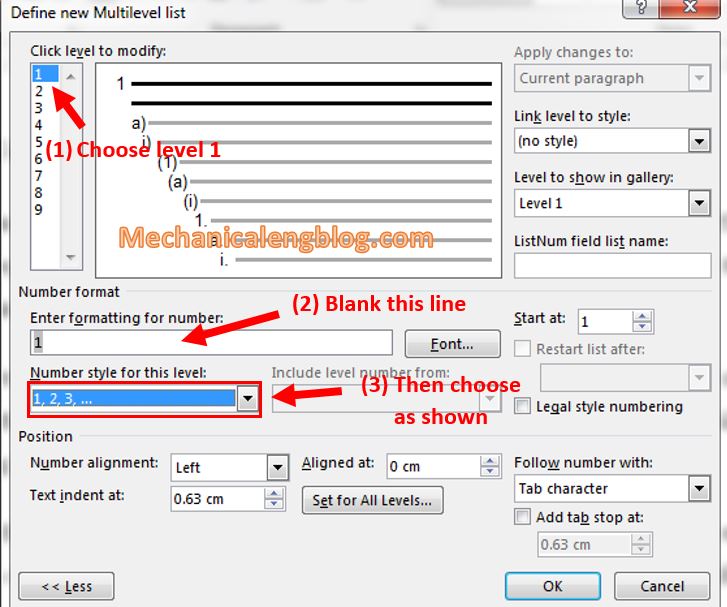
Step 3: At Level 1, first, blank in the line Enter Formating for number, then in the Number style for this level, choose type 1, 2, 3 … as shown.
Then you do as the following:
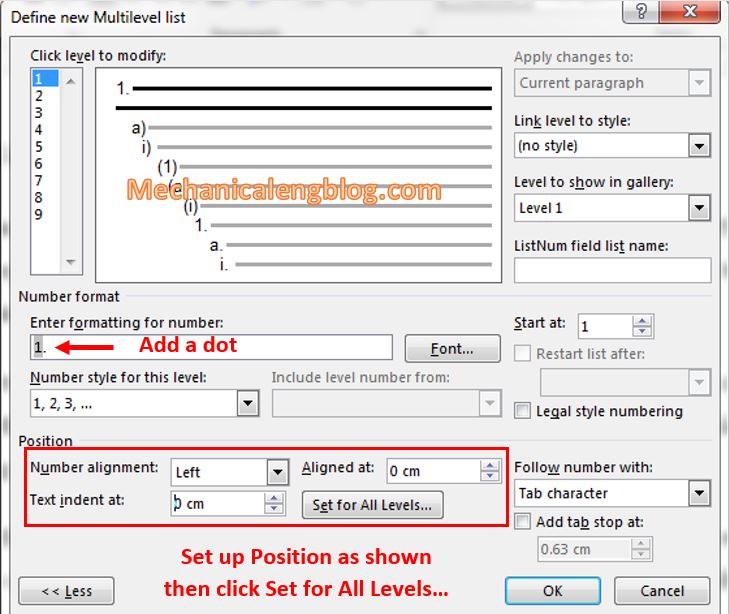
– Add a dot “.” After the number 1 on the Enter Formating for number line.
– In Position, set as follows: Number aligment: Left; Aligned at: 0 cm; Text indent at: 0 cm.
Then click Set for All levels….
Another window pops-up, set all of them to 0 cm.
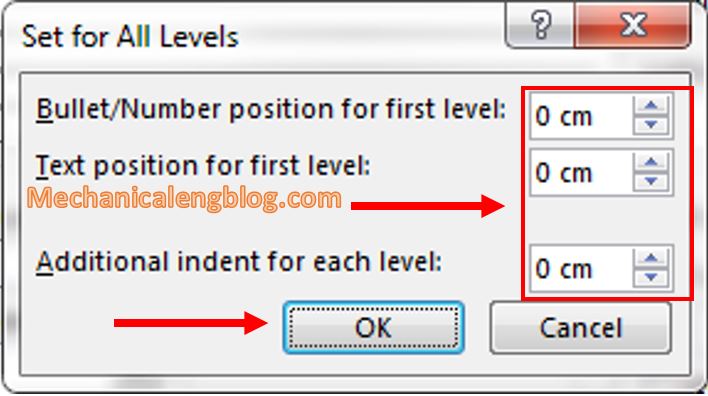
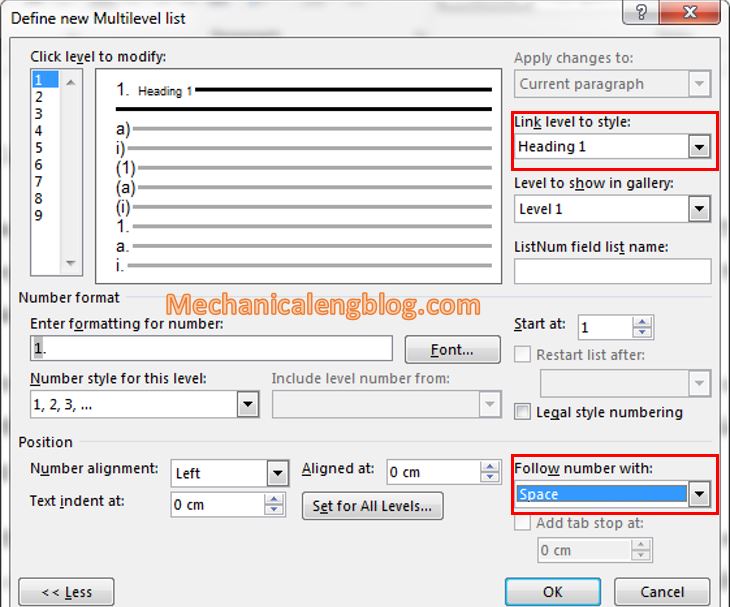
Step 4: Continue to assign Level 1 as Heading 1 in the Link level to style section. Choose Space at the Follow number with.
2. Customize Style for level 2.
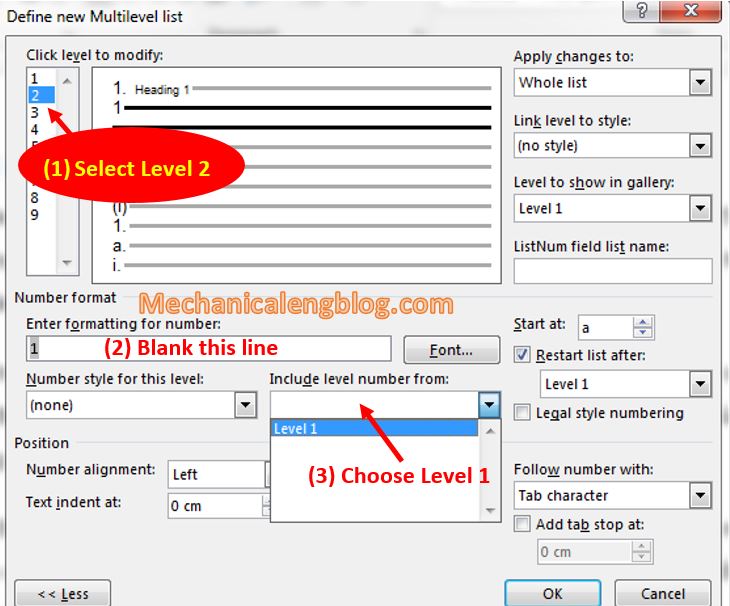
Step 5: Select Level 2, blank the Enter Formating for number line. In the Include level number from, choose Level 1
Step 6: Add a single dot behind the number 1 in Enter Formating for number, and in the Number style for this level, choose 1,2,3…
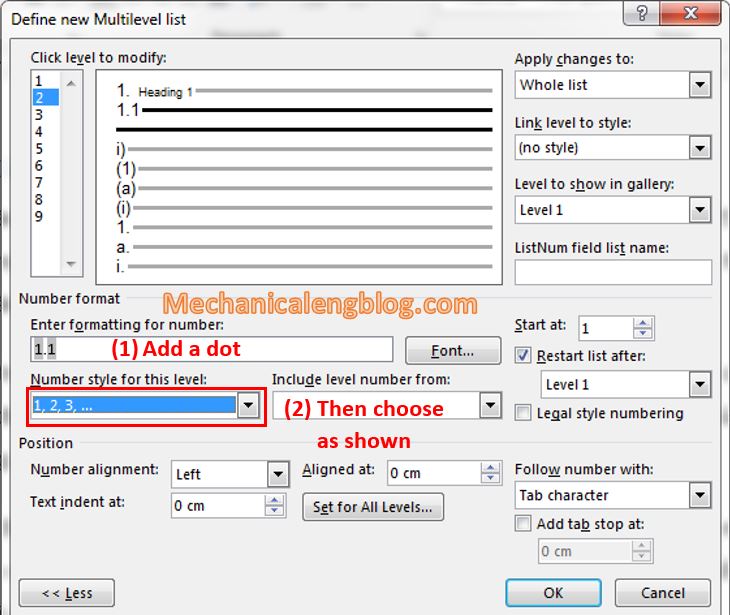
Step 7: Continue to add a dot after the number 1.1 in the Enter Formating for number box.
In Link level to style choose Heading 2. In the Follow number with you also let it be Space.

3. Customize Style for level 3.
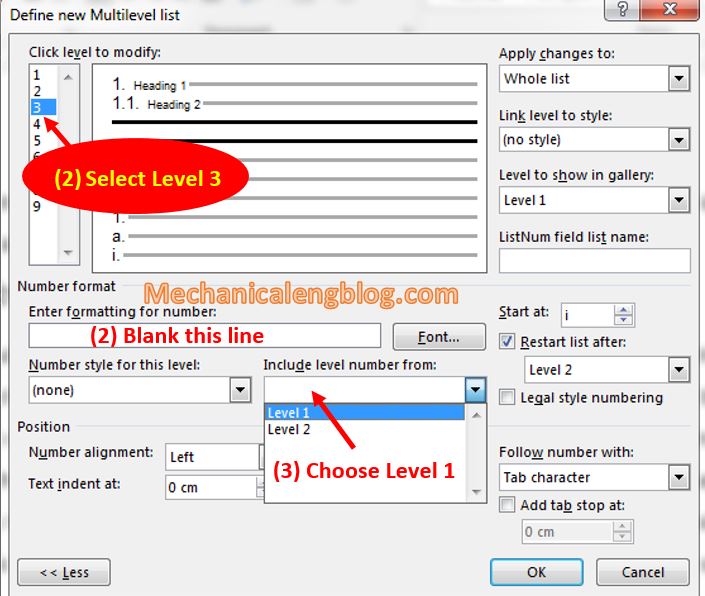
Step 8: For the next setting for level 3, you also blank the Enter Formating for number section.
In the Include level number from, choose Level 1.
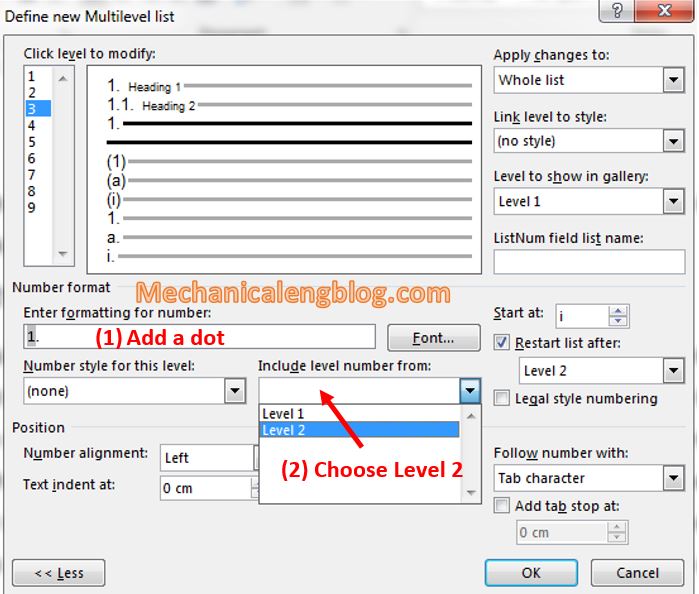
Step 9: Add a dot after number 1 in the Enter Formating for number, continue to select Level 2 in the Include level number from.
Step 10: Continue adding a dot after number 1.1 in the Enter Formating for number and select type 1, 2, 3… in Number style for this level.

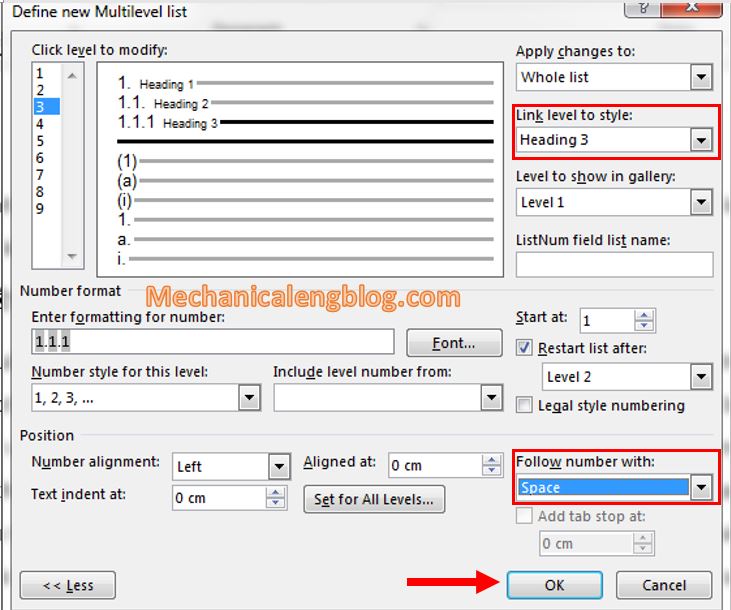
Step 11: Also assign level 3 to Heading 3 in Link level to style. And in the Follow number with you also leave it as Space.
Then click OK to finish creating Word Style.
Do the same if there’re more headings.
III. Assign Heading to create a table of contents in word.
Step 12: As you can see the styles that you just created will now appear in tab Home.
If your file has been numbered before, then delete it for the Style feature to create itself. For example I will remove the number 1. in my first title.
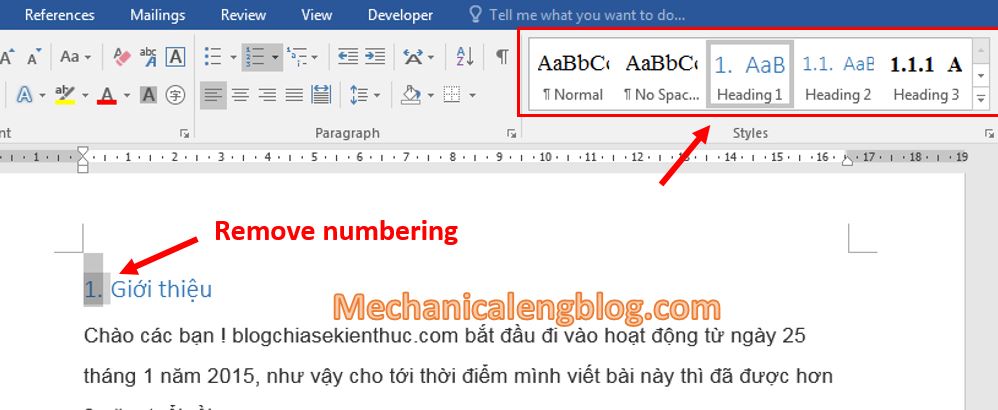
Step 13: In the Style section, click the arrow to open the Style frame as shown below.
Then place the cursor on the line Introduction and assign it as Heading 1. At this time the introduction line is Level 1.

Do the same with other Headings.
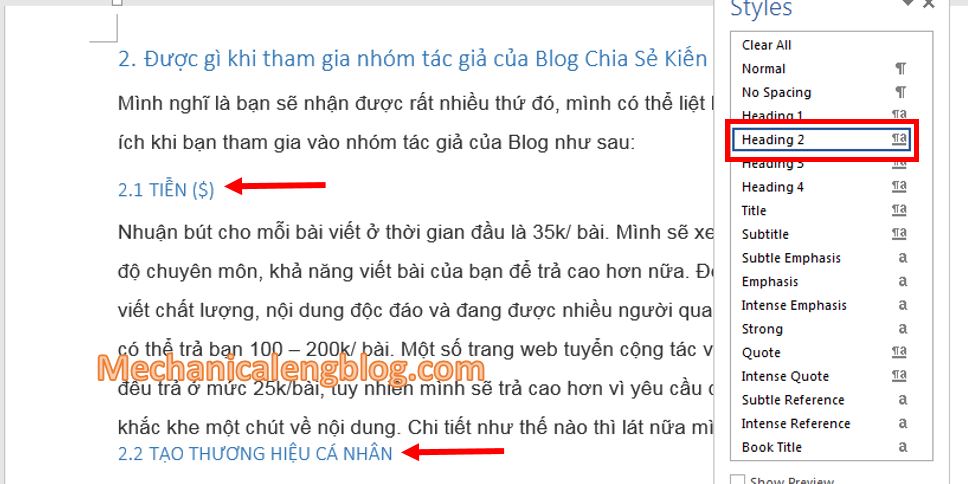
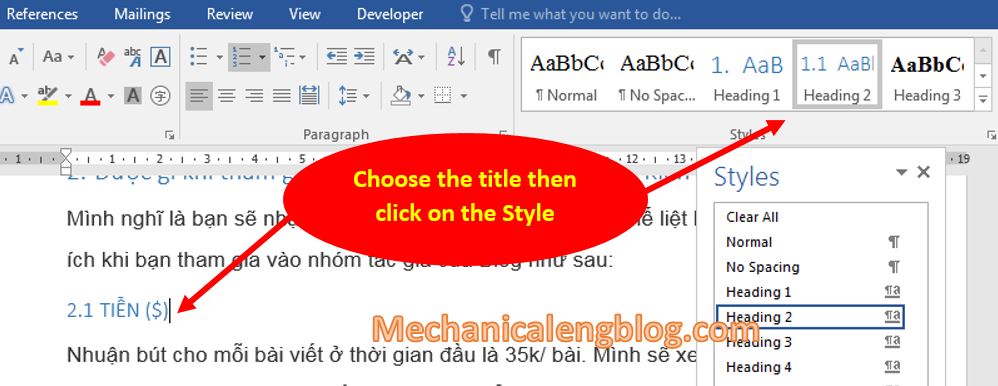
Step 14: After the assignment is complete, you may some bad font sizes. Please do as follows:
Place the cursor on the title you want to change the font size then click on the corresponding Style.
If you want more adjusting options, right-click at the Heading and choose Modify to open the Modify Style box.
You can change the Font for title, font style (bold, italic, underline)…. In Formatting.
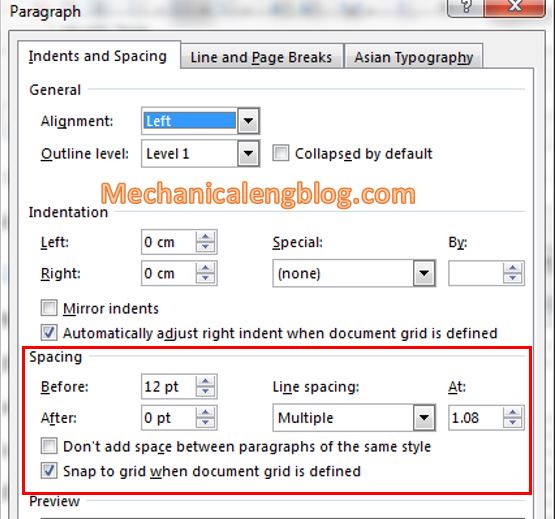
To adjust the spacing of title tags to textual content, click on Format, then Paragraph to open the Paragraph box, adjustments are made in Spacing.
IV. Insert Table of Contents in word.
Step 15: Put the cursor at the top of the document then go to Layout, select Next Page.
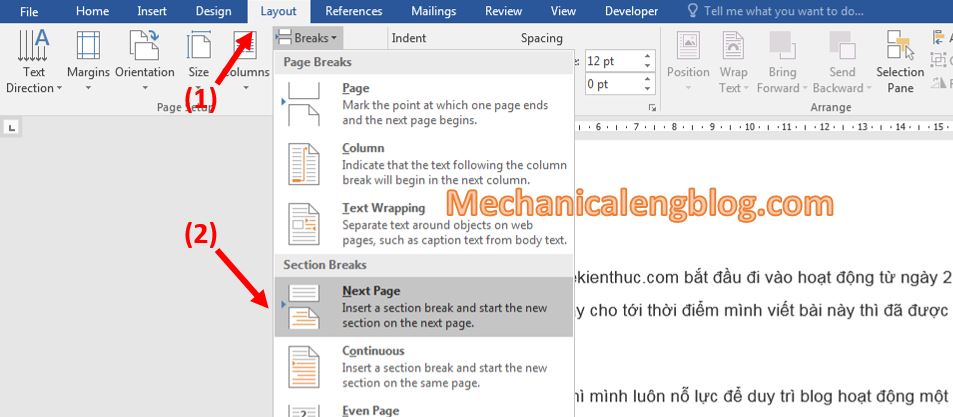
Step 16: At this point, Word will create a blank page at the beginning. Place the cursor on that page then choose References, select Table of contents.
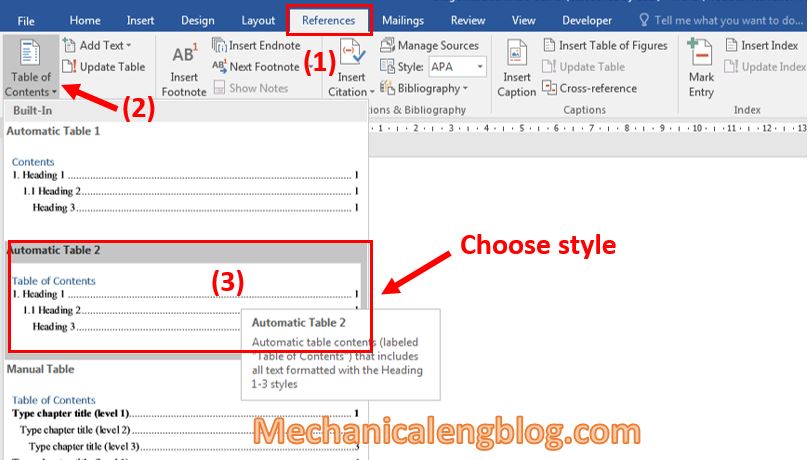
Choose the Table of Contents style you want to add.
There, we have created a table of contents, you can go to tab Home to change the color, font size….
To quickly move to the content you want, hold CTRL then click on the title in the Table of Contents to move.
CONCLUSION
What a long post with a large amount of contents. Although this guide is lengthy, but the implementation is easy and quick enough to catch up. Because you only have to insert it once, the next time you can just directly use it.
And the very detailed tutorial shows you how to create a table of contents in Word with Multilevel List here please pause. Thank you for reading and if you have any questions about Word and its tips, please read the other blog posts.
Thanks and good luck!
-hhchi



Leave a Reply