Have you ever lost you word data because not always we remember to save it? This tutorial will show how to automatically create backup in Word.
During Word processing, sometimes you may encounter situations like power outage or a sudden shut down…This can cause file corruption or even file loss.
Or when you are presenting a writing idea, but suddenly you don’t want to use that idea anymore and want to go back to the old draft, what to do?
With two problems mentioned, the answer is you absolutely can go back to the original draft or restore the content. One of the features that very few people use to manipulate Word application, that I’m gonna show you right here, is how to enable automatic backup creation in Word, so you can restore a previous backup in the worst case.
In this article I’m doing it on Word 2016.
1. Enable Automatic create backup in Word.
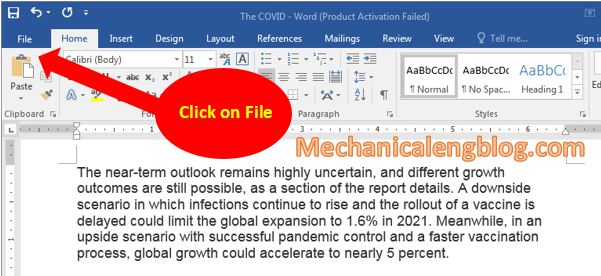
+ 1st: Click on the tab File on the top left corner of Word.

+ 2nd: Find Options at the bottom of the interface.

+ 3rd: At this point, Word will appear the Word Options box.
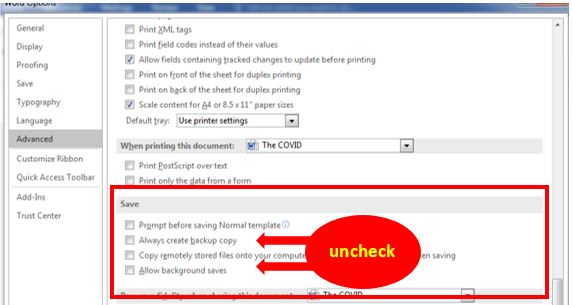
On the left side, look for the item Advanced. Then you look to the right and find the Save section. In turn, tick on both these two options: “Always create backup copy” and “Allow background saves”.

Always create backup copy: This feature allows you to create a 100% identical to the original backup copy in Word automatically. Every time you save a file; this backup is automatically saved as well.
Allow background saves: This option allows Word to create a backup of the background data (not the original data), so if you use this way to restore data it will lose a little bit of the content you put in, depends on the time you write in until when the problem occurs.
Note: Backup process of light data will take much faster than heavy data, backing up on a hard driver is faster than on an external storage device (USB…).
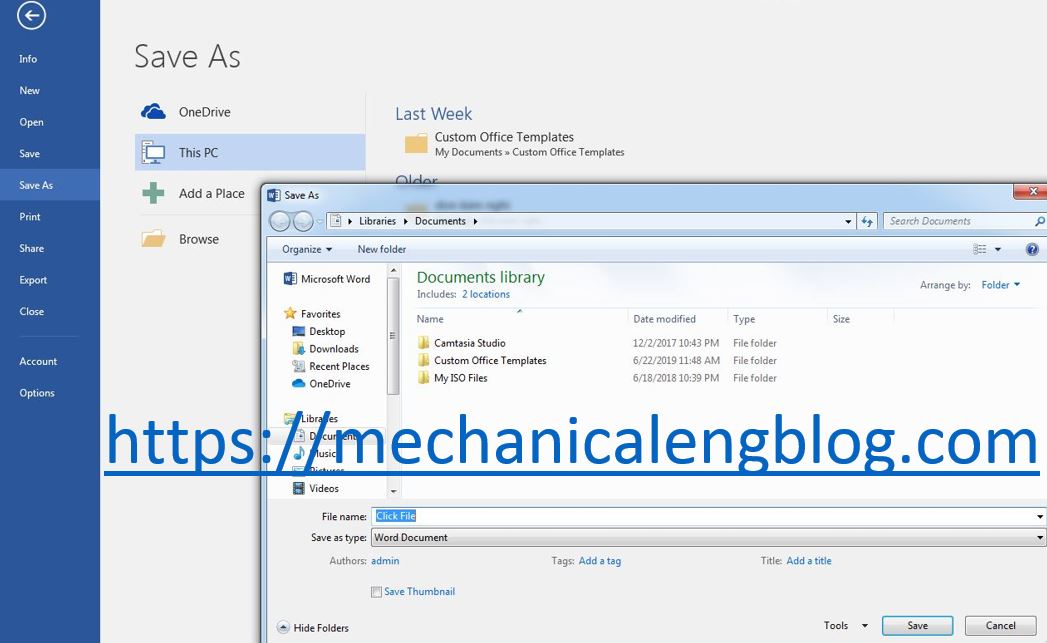
+ 4th: For the backup to be initialized, you must save you document by Save As twice (File => Save As) in the first time, from the second time it is no need.
And finally, select the folder where you want to store it.
The backup file will be in the same folder as the original file. You can freely open it and edit the content of this backup like usual.

From now on, when you create any Word file, it will also create a backup copy, along with the original.
2. Remove Automatic backup in Word.
If you find this feature troublesome, or no longer necessary, you can turn it off by going to File => Options => Advanced => Save.
At this step, uncheck at the two options mentioned earlier: Always create backup copy, and Allow background saves.

Last step is save it.
CONCLUSION
This is the detail instructions for how to enable automatically backup creation in Word. Hope this will be useful for your working progress, good luck.


Leave a Reply