Mail Merge in ms word is a useful feature that Microsoft also provides, to save a lot of time when creating notices, meetings, invitations, etc…. This means you have to send the same text sample to many different people, instead of having to fill in the sample one by one to each person, you just need to compose a fixed template with list of recipients and use the Mail Merge feature. If you haven’t heard about this yet, please refer to the tutorial article below.
The tutorial is made with Word version 2016. Other version you could just use the same method, no different.
How to use mail merge in ms Word 2016?
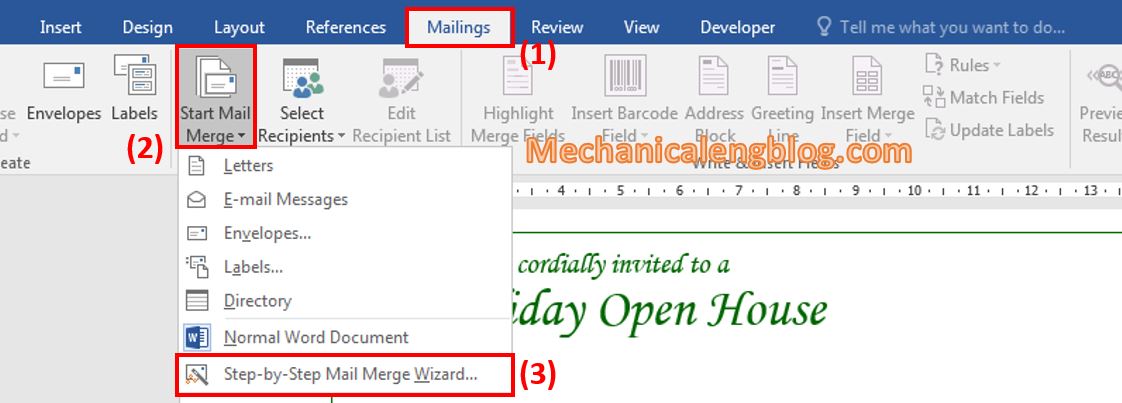
Step 1: Open the Word document that needs to be merged, on the interface, select Mailings tab, then Start Mail Merge, select Step-by-Step Mail Merge Wizard to prepare for the steps to merge mails.
Step 2: Select the type to mix for the document, for example here I want to create invitations, so I will choose Letters. Then, select Next: Starting document.

Step 3: Here you select the document to start to merge, here I have already opened the Word document to merge at the begining, so I choose Use the current document. Select Next: Select recipients.

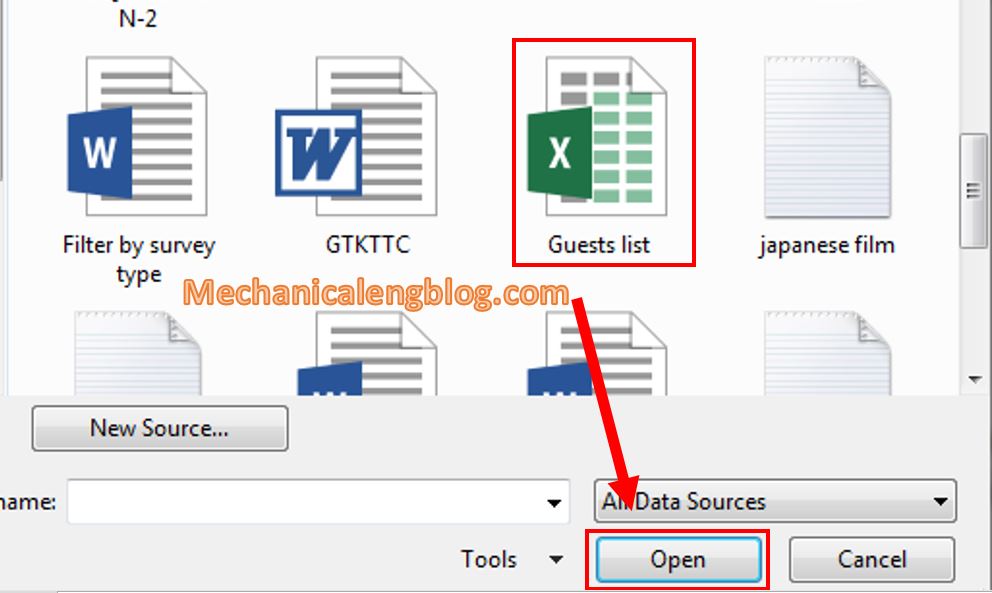
Step 4: In this step, you need to add the content to the file so that Word automatically adds the information to the invitation. If you don’t have one, choose Type a new list to create. If there is already an Excel file with the list of information, then choose Use an existing list, then select Browse to open the file.

In the Select Data Source window, select the list file and click Open.
Select the sheet containing the address list and click OK.

In the Mail Merge Recipients box, by default all recipients are selected, if you want to remove some names, you can uncheck at that person, after that click OK.

Click Next: Write your letter to move to the next step.

Step 5: Here to make it easier to understand, you do as following:
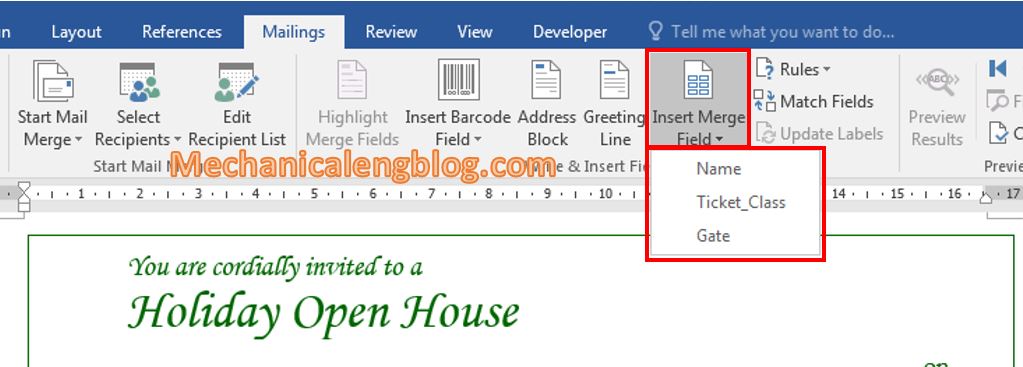
Place the cursor on the field you want to insert information, then select Mailings -> Insert Merge Field -> select the appropriate information field.
For example, in the line Dear Mr/Mrs, choose the field Name, in the line Ticket Class, choose the field Ticket Class, in Gate no:, choose the field Gate.
Or you can directly select the field in the Mail Merge window on the right. After done adding, select Next: Preview your letters to switch to the message preview step.

Step 6: To review the result, select Next: Complete the merge. Then select Edit Individual Letter…

Step 7: To print the mail, select Print, otherwise close the Mail Merge window.

CONCLUSION
So now you have know how to merge mail, documents in Word 2016. From now on, if you need to write invitations, letters … and send it to a large number of people, you just need to do the exact steps of mail merge as above, then you will shorten the time compared to having to write each letter to 1 recipient yourself. How convenient it is!
That’s for today’s post. Thank you for visiting and wish you the best luck.
-hhchi


Leave a Reply