In this tutorial, I will guide to you 4 ways to insert diagonal line in Word table. You can do it by border option, mini toolbar, draw table tool. The diagonal line in a cell – usually in the first and top cell of a table – is used to divide content by horizontal and vertical rows. If you haven’t imagined yet, it should look like this.

When working with tables in Word, sometimes we will encounter situations where it is imperative to create a diagonal line in the first cell, or a random cell, to split the cell into two parts. So that the spited cell will become a title cell.
Thereby also helps us to present content more scientifically, such as schedule, group plans …. But many of the users are just getting acquainted with Word, so I’m sharing with you how to create it quickly and effectively.
I. Insert diagonal line in word using Borders.
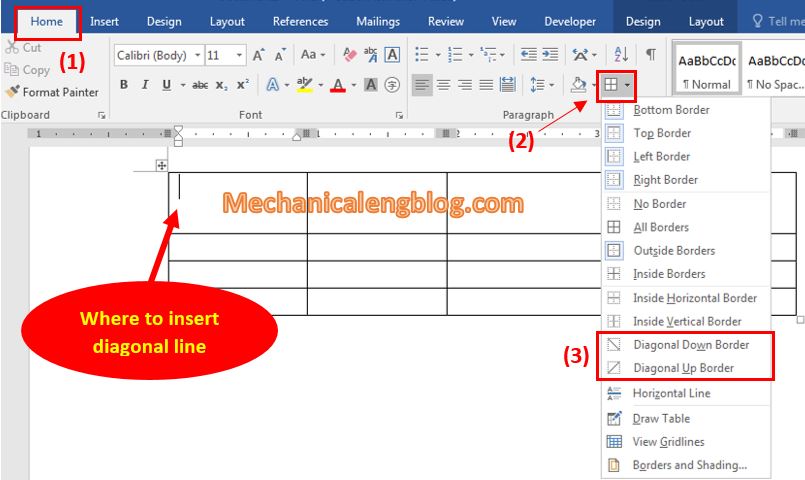
On the table, place the cursor at the cell to create diagonal line, then go to tab Home.
In the Paragraph section, click the drop-down arrow next to the Borders icon. Scroll down and you can see the 2 types of diagonal border like this below.

Depends on your need choose the direction you want by clicking onto them. You can see the cell now has been splited.

#2. Draw diagonal lines using Mini Toolbar.
Mini Toolbar is a tool that allows us to quickly format documents. Usually you can select any word or paragraph, Mini Toolbar will appear allowing you to change the font, font size, background color, font color …
Step 1: Select the cell which you want to draw diagonal line then right-click, at this time the Mini Toolbar appears above.

Step 2: Find the Borders icon and click the drop-down arrow. Choose the diagonal style you want, same as the first method.

#3. Insert diagonal line in word Using Draw Table tool.
Step 1: Select the cell to draw diagonal line. Go to tab Insert and choose Table, select Draw Table as shown below.

Step 2: Now the cursor has turned into a pen, in the cell you want to draw diagonal line, hold the cursor and drag to draw a diagonal.

#4. Writing in cell with diagonal line.
Although there is no specific tool to help you write text in cells with diagonal line, still there is a very simple way to do it. Please follow the steps below.
For example in this timetable, the title for the above part of the cell will be Day, the below part will be Subject.

Step 1: After creating a diagonal line in the cell, select the first cell and type the content for the above part.
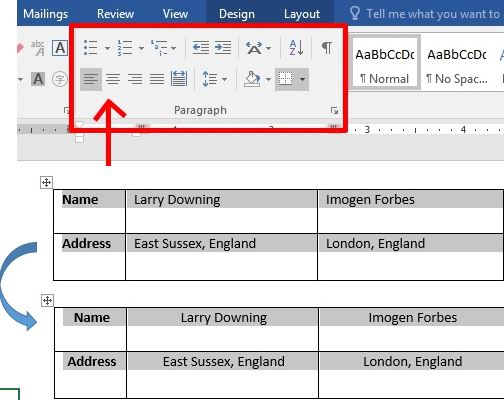
After that select the word and right-align the text by going to tab Home and selecting Align Right. (Ctrl + R)

Step 2: Press enter and type in the text for the below part. Then select the word then choose left-align in Home => Paragraph (Ctrl + L)

The result will be displayed like this.

CONCLUSION
Nothing complicated, right? So now you know how to draw diagonal line for a cell when working with tables in Word. Just do it a few times to remember, every time you make a schedule or simply edit the table, remember this tip.
And at the same time, you also know how to write text in a diagonal cell. Hopefully, through this article today, you can get more knowledge to serve your work.
Thanks for reading an good luck !
-hhchi


Leave a Reply